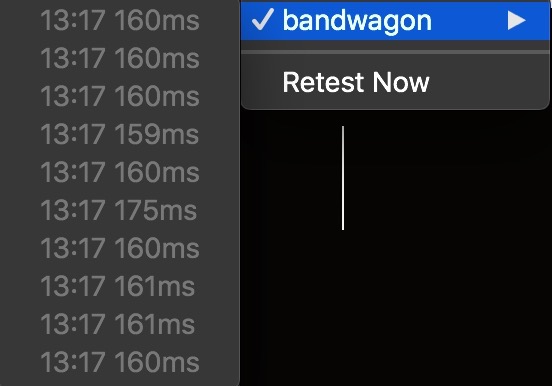
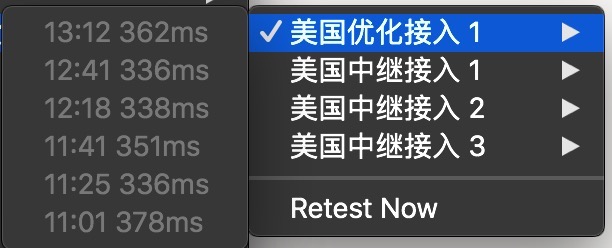
现在的互联网环境有很多的服务可以提升我们的工作效率和生活质量,也很容易甄别,比如:
 根据主观判断一眼就能知道应该选择的服务了。
随着有关部门倒车技术的突飞猛进,诸多膜法服务争相跑路,自力更生搭建代理服务可能算是当前连接真·互联网的必要手段了。
修改Ubuntu 16.04系统设置
1
2
3
4
5
6
| root@ubuntu:/home/yee# echo -e "root soft nofile 65535\nroot hard nofile 65535\n* soft nofile 65535\n* hard nofile 65535" >> /etc/security/limits.conf
root@ubuntu:/home/yee# echo "session required pam_limits.so" >> /etc/pam.d/common-session
# 重启系统生效
root@ubuntu:/home/yee# reboot
|
uname -r 检查当前系统内核版本是否>=4.9,一般16.04自带的还是4.4,需要手动升级一下:
1
2
3
4
| root@ubuntu:/home/yee# wget http://kernel.ubuntu.com/~kernel-ppa/mainline/v4.12.4/linux-image-4.12.4-041204-generic_4.12.4-041204.201707271932_amd64.deb
root@ubuntu:/home/yee# dpkg -i linux-image-4.*.deb
root@ubuntu:/home/yee# update-grub
root@ubuntu:/home/yee# reboot
|
然后再次检查,确认没问题就可以 dpkg -l | grep linux-image 输出安装的内核列表,通过 apt purge 命令将不用的老版本删除腾出空间。接着
1
2
3
4
| root@ubuntu:/home/yee# echo "net.core.default_qdisc=fq" >> /etc/sysctl.conf
root@ubuntu:/home/yee# echo "net.ipv4.tcp_congestion_control=bbr" >> /etc/sysctl.conf
root@ubuntu:/home/yee# sysctl -p
root@ubuntu:/home/yee# reboot
|
重启后执行
1
2
3
4
5
6
| root@ubuntu:/home/yee# sysctl net.ipv4.tcp_available_congestion_control
net.ipv4.tcp_available_congestion_control = bbr cubic reno
root@ubuntu:/home/yee# sysctl net.ipv4.tcp_congestion_control
net.ipv4.tcp_congestion_control = bbr
root@ubuntu:/home/yee# lsmod | grep bbr
tcp_bbr 20480 7
|
说明已经正确开启了。
1
2
| root@ubuntu:/home/yee# echo 3 > /proc/sys/net/ipv4/tcp_fastopen
root@ubuntu:/home/yee# echo "net.ipv4.tcp_fastopen = 3" >> /etc/sysctl.conf
|
TFO的好处是当验证客户端成功后,可以在三次握手最终的ACK包收到之前就开始发送数据,节省RTT,降低延迟。
客户端开启TFO后,在server上通过
1
2
3
| root@ubuntu:/home/yee# grep '^TcpExt:' /proc/net/netstat | cut -d ' ' -f 91-96 | column -t
TCPFastOpenActive TCPFastOpenActiveFail TCPFastOpenPassive TCPFastOpenPassiveFail TCPFastOpenListenOverflow TCPFastOpenCookieReqd
5426 46 6945 1 83 22
|
如果可以看到TCPFastOpenPassive递增的话说明成功。
1
2
3
4
5
| root@ubuntu:/home/yee# RAND=$(openssl rand -hex 16)
root@ubuntu:/home/yee# NEWKEY=${RAND:0:8}-${RAND:8:8}-${RAND:16:8}-${RAND:24:8}
root@ubuntu:/home/yee# echo "net.ipv4.tcp_fastopen_key=$NEWKEY" >> /etc/sysctl.conf
root@ubuntu:/home/yee# sysctl -p /etc/sysctl.conf
root@ubuntu:/home/yee# unset RAND NEWKEY
|
via: TCP Fast Open
低配VPS的系统资源都比较紧张,这里选用最经济的C语言版本作为服务端。
以下命令均在root账号下执行。
1
2
| root@ubuntu:/home/yee# add-apt-repository ppa:max-c-lv/shadowsocks-libev
root@ubuntu:/home/yee# apt update && apt install shadowsocks-libev
|
 1
 2
 3
 4
 5
 6
 7
 8
 9
10
| root@ubuntu:/home/yee# apt install --no-install-recommends build-essential autoconf libtool libssl-dev libpcre3-dev libudns-dev libev-dev asciidoc xmlto automake
root@ubuntu:/home/yee# git clone https://github.com/shadowsocks/simple-obfs.git
root@ubuntu:/home/yee# cd simple-obfs
root@ubuntu:/home/yee# git submodule update --init --recursive
root@ubuntu:/home/yee# ./autogen.sh
root@ubuntu:/home/yee# ./configure && make
root@ubuntu:/home/yee# make install
# 为了提升随机数生成效率,安装下rng-tools
root@ubuntu:/home/yee# apt install rng-tools
|
1
2
| root@ubuntu:/home/yee# adduser --system --disabled-password --disabled-login --no-create-home shadowsocks
root@ubuntu:/home/yee# sed -i 's/User=nobody/User=shadowsocks/' /lib/systemd/system/shadowsocks-libev.service
|
有些运营商会对高位端口做QoS,对此可以允许应用占用低位端口来规避。
1
2
| root@ubuntu:/home/yee# setcap 'cap_net_bind_service=+ep' `which ss-server`
root@ubuntu:/home/yee# setcap 'cap_net_bind_service=+ep' `which obfs-server`
|
- 修改
/etc/shadowsocks-libev/config.json 配置文件
 1
 2
 3
 4
 5
 6
 7
 8
 9
10
11
12
13
| {
"server":"0.0.0.0",
"server_port":911,
"local_port":1080,
"password":"Your_lovely_passwd",
"nameserver":"1.1.1.1",
"timeout":3600,
"method":"aes-256-gcm",
"mode": "tcp_and_udp",
"fast_open": true,
"plugin":"obfs-server",
"plugin_opts":"obfs=http;fast-open"
}
|
加密算法可以在支持AEAD的四种中任选。
1
2
| root@ubuntu:/home/yee# ufw allow 911 comment 'shadowsocks-libev'
root@ubuntu:/home/yee# iptables-save > /etc/iptables.up.rules
|
编辑 /etc/ufw/before.rules ,在 # End required lines 之后加上
1
| -A ufw-before-output -m owner --uid-owner shadowsocks -p tcp -s 127.0.0.1 -j DROP
|
1
| root@ubuntu:/home/yee# systemctl enable shadowsocks-libev
|
Ubuntu 16.04包管理安装的加密库libsodium最新还是 1.0.11 ,ss-server能正常运行但官方推荐版本是>=1.0.12,不犯懒的话可以手动升级到新版本:
 1
 2
 3
 4
 5
 6
 7
 8
 9
10
11
12
13
14
15
16
17
18
19
20
21
22
23
24
25
26
27
28
| # Install basic build dependencies
sudo apt-get install --no-install-recommends gettext build-essential autoconf libtool libpcre3-dev asciidoc xmlto libev-dev libc-ares-dev automake libmbedtls-dev libsodium-dev
# Install Libsodium
export LIBSODIUM_VER=1.0.15
wget https://download.libsodium.org/libsodium/releases/libsodium-$LIBSODIUM_VER.tar.gz
tar xvf libsodium-$LIBSODIUM_VER.tar.gz
pushd libsodium-$LIBSODIUM_VER
./configure --prefix=/usr && make
sudo make install
popd
sudo ldconfig
# Install MbedTLS
export MBEDTLS_VER=2.6.0
wget https://tls.mbed.org/download/mbedtls-$MBEDTLS_VER-gpl.tgz
tar xvf mbedtls-$MBEDTLS_VER-gpl.tgz
pushd mbedtls-$MBEDTLS_VER
make SHARED=1 CFLAGS=-fPIC
sudo make DESTDIR=/usr install
popd
sudo ldconfig
# Start building
pushd libsodium-$LIBSODIUM_VER
./autogen.sh && ./configure && make
sudo make install
popd
|
启动运行
1
| root@ubuntu:/home/yee# systemctl start shadowsocks-libev
|
就可以测试使用啦。
海啸BBR
注意:以下方式如使用不当可能会招致服务商封禁,请自行衡量
很多时候线路的好坏不单得考虑机房,很大程度上还取决于你的邻居。如果其他人都使用锐速/kcptun疯狂发包的话,这网络质量肯定也好不了。
还好有hostloc高人拯救,这篇魔改BBR算法的尝试经过测试效果拔群,值得一试。安装方法:
 1
 2
 3
 4
 5
 6
 7
 8
 9
10
11
12
13
14
15
| root@ubuntu:/home/yee# wget http://kernel.ubuntu.com/~kernel-ppa/mainline/v4.12.4/linux-headers-4.12.4-041204_4.12.4-041204.201707271932_all.deb
root@ubuntu:/home/yee# wget http://kernel.ubuntu.com/~kernel-ppa/mainline/v4.12.4/linux-headers-4.12.4-041204-generic_4.12.4-041204.201707271932_amd64.deb
root@ubuntu:/home/yee# dpkg -i linux-headers-4.12.4-041204*.deb
root@ubuntu:/home/yee# reboot
root@ubuntu:/home/yee# apt install make gcc # 如果已经安装了gcc可以跳过
root@ubuntu:/home/yee# wget -O ./tcp_tsunami.c https://gist.github.com/anonymous/ba338038e799eafbba173215153a7f3a/raw/55ff1e45c97b46f12261e07ca07633a9922ad55d/tcp_tsunami.c
root@ubuntu:/home/yee# echo "obj-m:=tcp_tsunami.o" > Makefile
root@ubuntu:/home/yee# apt install make
root@ubuntu:/home/yee# make -C /lib/modules/$(uname -r)/build M=`pwd` modules CC=`which gcc`
root@ubuntu:/home/yee# install tcp_tsunami.ko /lib/modules/$(uname -r)/kernel
root@ubuntu:/home/yee# depmod -a
root@ubuntu:/home/yee# insmod tcp_tsunami.ko
root@ubuntu:/home/yee# echo "net.ipv4.tcp_congestion_control=tsunami" >> /etc/sysctl.conf
root@ubuntu:/home/yee# reboot
|
嫌麻烦的可以选择热心网友整理的一键脚本:
OpenVZ租户参考linhua的魔改版。
Update:
搬瓦工CN2的线路还是很不错的,用下来比某服务商的美国优化线路好不少


History
| Version | Action | Time |
|---|
| 1.0 | Initial commit | Aug 09, 2017 |
| 1.1 | Fix TCP Fast Open setting | Jun 07, 2018 |
| 1.2 | Add tcp_fastopen_key generator | Jun 23, 2018 |
 根据主观判断一眼就能知道应该选择的服务了。
