在fly.io上部署snac2实例
低成本创建ActivityPub通讯应用
· 3 min read
因为是 Fly 的早期用户,还可以在上面开启免费的低配置实例,之前尝试过用它来部署 gotosocial ,很不幸对硬件的需求还是有点超标,有时候资源占用率一下就冲了上去,只好放弃。
最近看到用C语言实现ActivityPub协议的 snac2 项目,心里又有点痒,于是又自己部署了一次,现在看下来资源使用非常低,即便是免费的实例跑着也没压力。

准备工作 #
下载代码仓库 #
% git clone https://codeberg.org/grunfink/snac2.git
% cd snac2
% git checkout -b flyio
修改仓库的 Dockerfile
#
- 因为使用的基础镜像是Alpine,需要自行安装tzdata以支持时区配置,改完后的内容
- Docker镜像启动时entrypoint默认生成的配置端口为8001,和Dockerfile的5050不一致,统一改成8001
ARG ALPINE_VERSION=latest
FROM alpine:${ALPINE_VERSION} AS builder
COPY . /build
RUN apk -U --no-progress --no-cache add curl-dev build-base && \
cd /build && make && \
make PREFIX="/build/out/usr/local" PREFIX_MAN="/build/out/usr/local/share/man" install && \
chmod +x examples/docker-entrypoint.sh && \
cp examples/docker-entrypoint.sh /build/out/usr/local/bin/entrypoint.sh
FROM alpine:${ALPINE_VERSION}
RUN apk -U --no-progress --no-cache add libcurl tzdata
COPY --from=builder /build/out /
EXPOSE 8001
VOLUME [ "/data" ]
ENTRYPOINT [ "/usr/local/bin/entrypoint.sh" ]
修改仓库的 example/docker-entrypoint.sh
#
默认的host是localhost,我需要自己配置域名,图简单就在这里改一下,第一次运行时会生成对应的应用配置文件
#! /bin/sh
if [ ! -e /data/data/server.json ]
then
echo -ne "0.0.0.0\r\n8001\r\ntoot.josta.me\r\n\r\n\r\n" | snac init /data/data
snac adduser /data/data testuser
fi
SSLKEYLOGFILE=/data/key snac httpd /data/data
安装fly控制台工具 #
% brew install flyctl
# 登录fly账号
% fly auth login
修改生成的fly.toml #
- 设定时区环境变量
TZ - 因为ActivityPub实例要常开,将
auto_stop_machines的值从默认stop改成off避免自动关闭 - 指定实例运行的硬件资源在
[[vm]]区
app = 'snac2'
primary_region = 'sin'
[build]
dockerfile = "Dockerfile"
[env]
TZ="Asia/Singapore"
[[mounts]]
source = 'data'
destination="/data"
[http_service]
internal_port = 8001
force_https = true
auto_stop_machines = 'off'
auto_start_machines = true
min_machines_running = 0
processes = ['app']
[http_service.tls_options]
alpn = ["h2", "http/1.1"]
versions = ["TLSv1.2", "TLSv1.3"]
default_self_signed = false
[[vm]]
size = 'shared-cpu-1x'
memory = "256mb"
第一次启动的工作 #
% fly launch
...
Watch your deployment at https://fly.io/apps/snac2/monitoring
...
Creating a 1 GB volume named 'data' for process group 'app'. Use 'fly vol extend' to increase its size
This deployment will:
* create 1 "app" machine
No machines in group app, launching a new machine
...
Finished launching new machines
-------
NOTE: The machines for [app] have services with 'auto_stop_machines = "stop"' that will be stopped when idling
-------
...
创建用户 #
应用初始化时候自动创建了一个test用户,这里删除它并手动创建我们自己的账号
# ssh 登录实例
% fly ssh console
# 删除自动创建的测试用户
% /usr/local/bin/snac deluser /data/data testuser
# 创建新用户
% /usr/local/bin/snac adduser /data/data $user
Creating RSA key...
Done.
User password is $password_here$
Go to https://toot.josta.me/yee and continue configuring your user there.
配置DNS #
按照 fly custom domain 的说明,先给新实例添加自定义域名:
% flyctl certs add toot.josta.me
然后就可以在fly.io的dashboard上看到需要配置的DNS Records,一共有两个
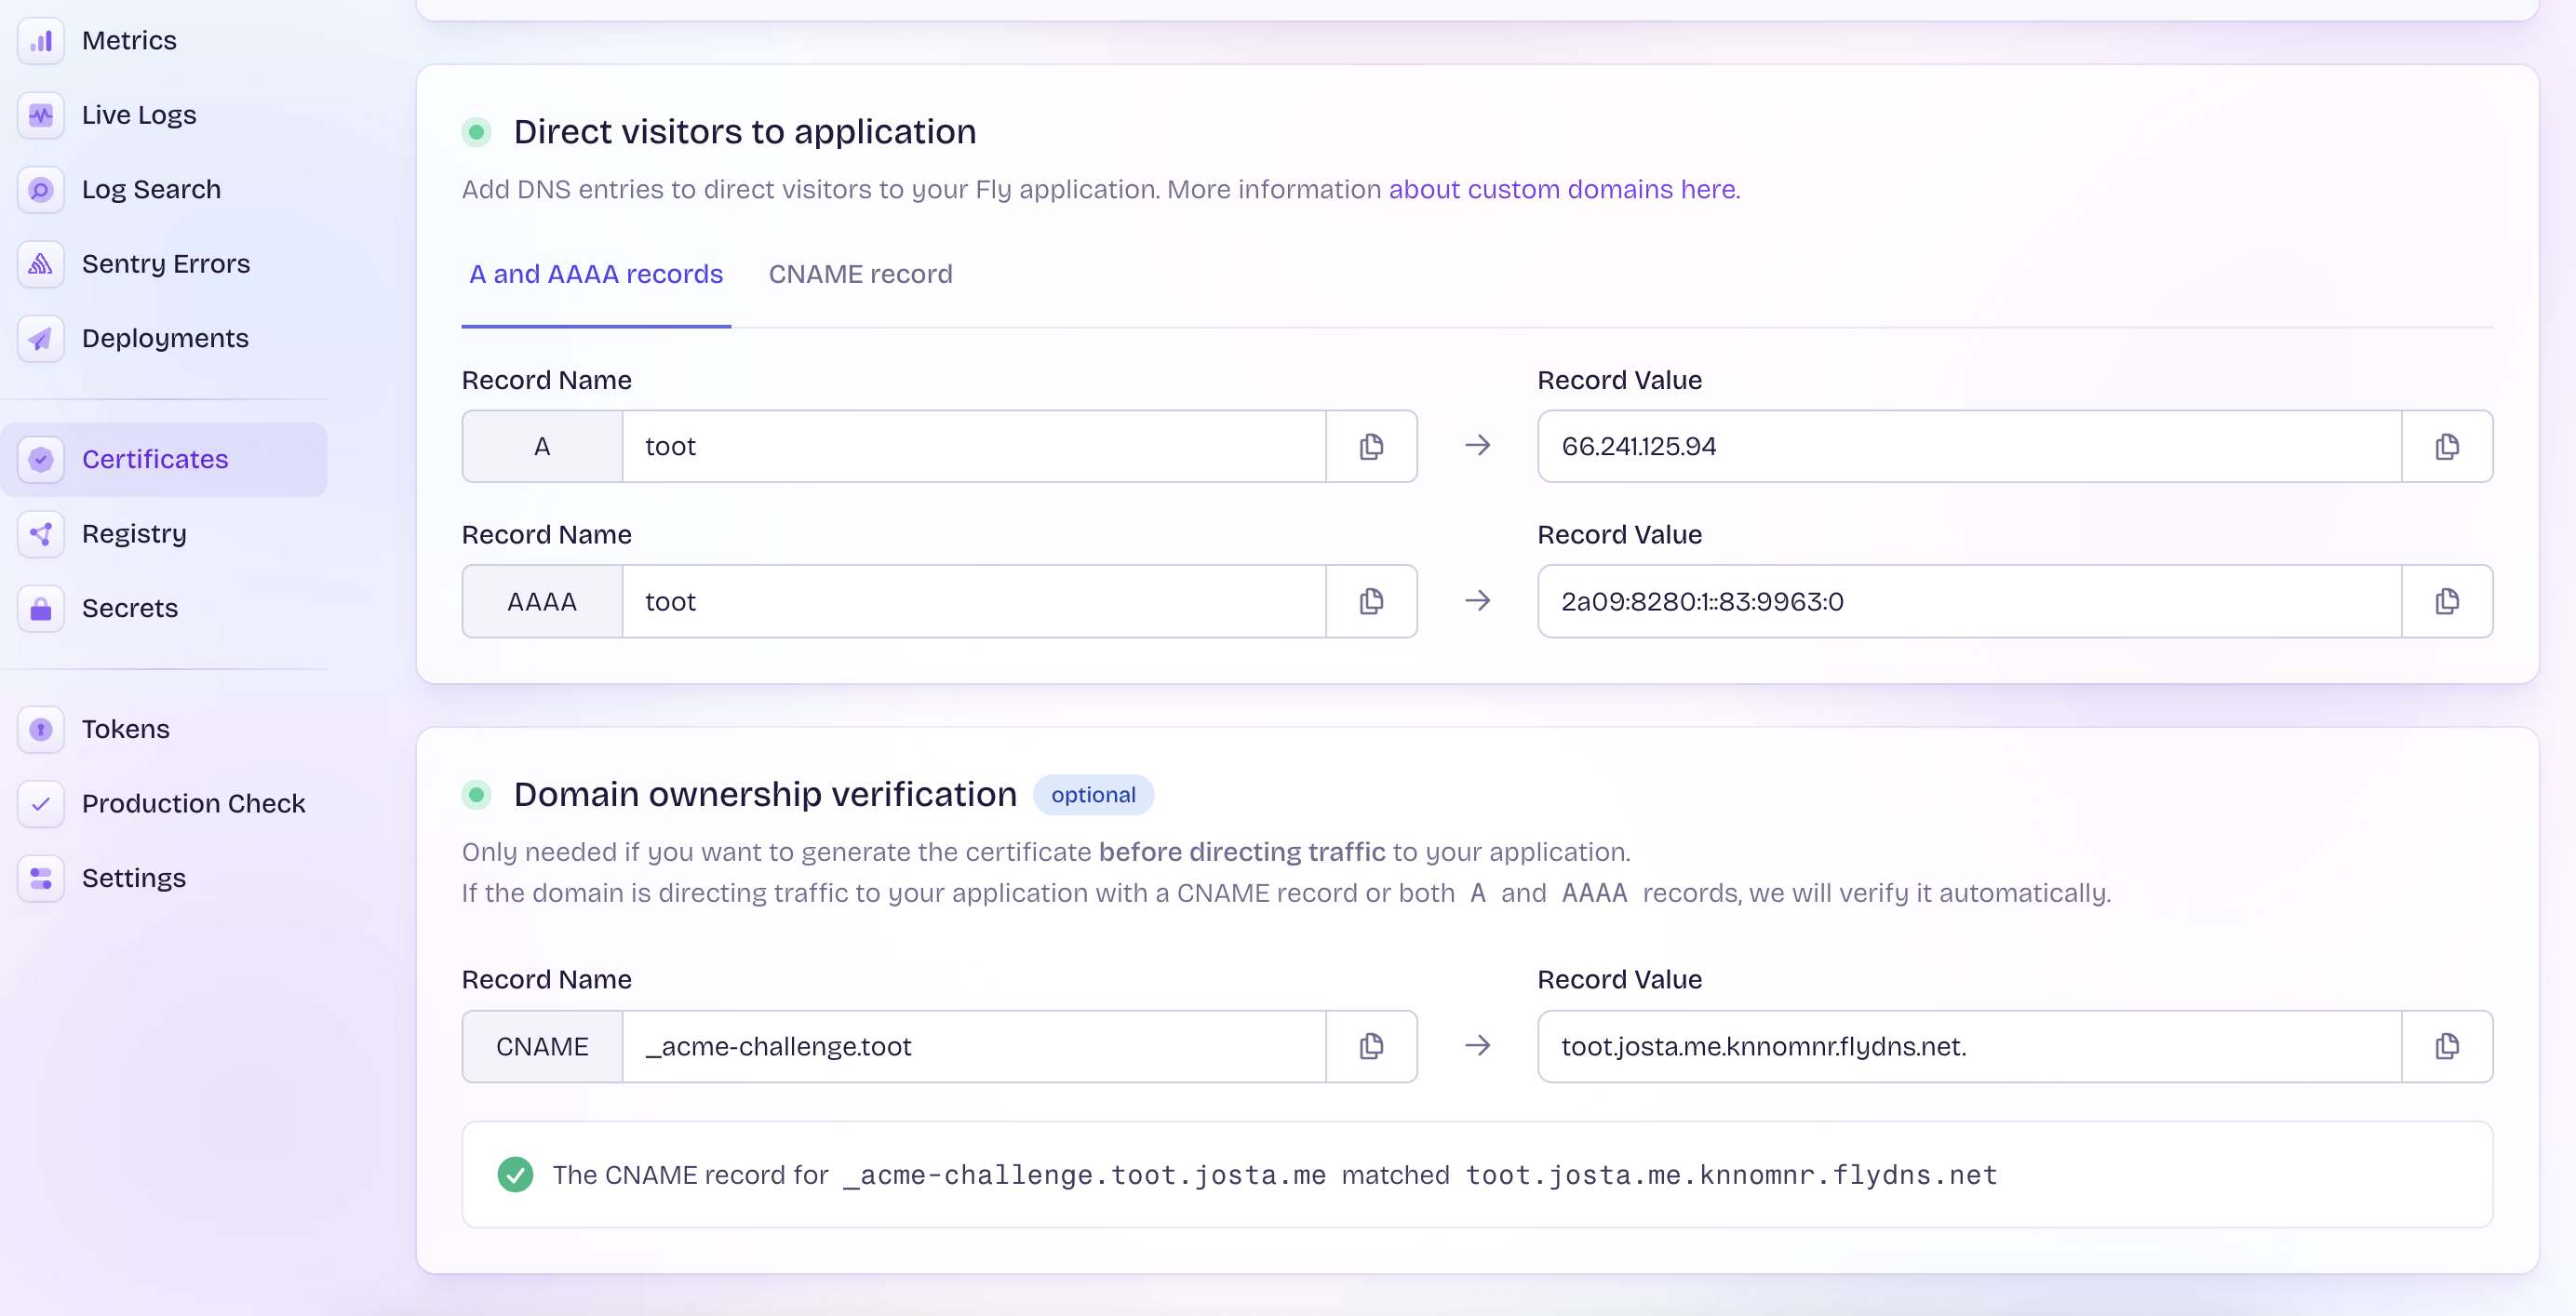
我的域名托管在 Cloudflare ,上去增加这两条记录。
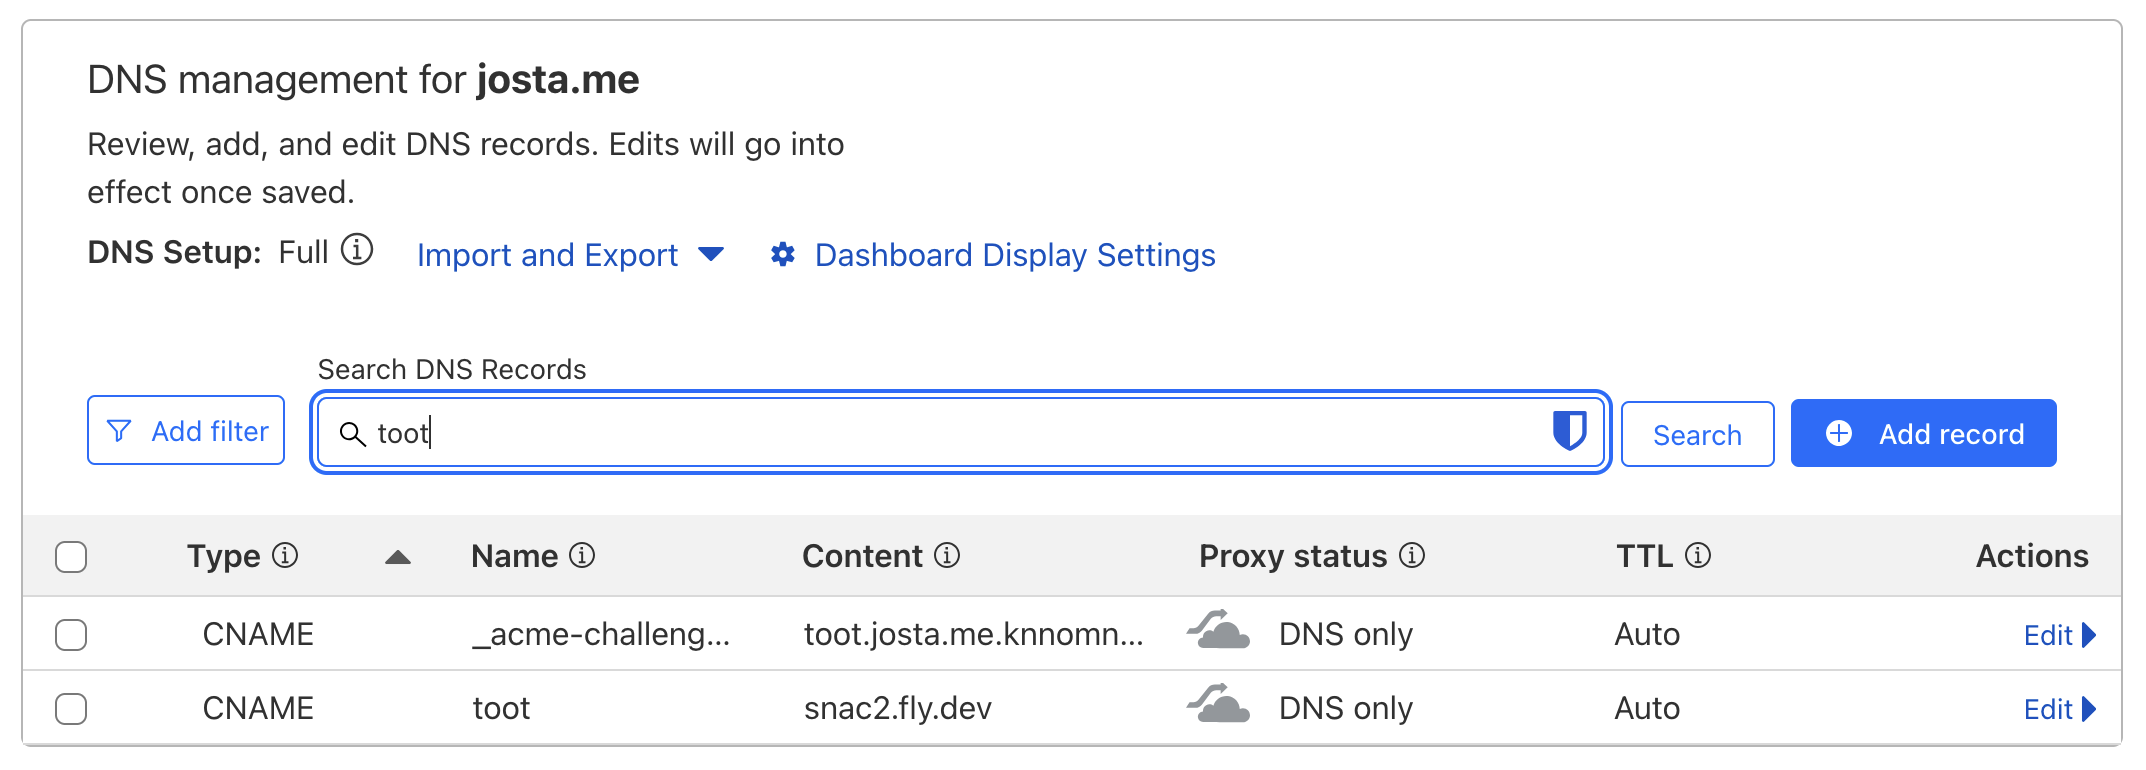
等待解析成功就可以通过自己的域名访问了。
修改主题 #
如果不喜欢默认的theme,可以从 voron/snac-style 仓库挑选一个自己喜欢的配上。snac2的处理方式比较简单,直接修改对应的css文件即可。
系统主题css #
修改 /data/data/style.css
用户个人的主题css #
修改 /data/data/user/$user/static/style.css
更新部署 #
后续如果上游的代码有更新,可以合并到自己分支后再部署。
% git fetch
% git merge master
% fly deploy
==> Verifying app config
Validating .../fly.toml
✓ Configuration is valid
--> Verified app config
==> Building image
==> Building image with Depot
--> build:
[+] Building 6.7s (10/10) FINISHED
...
--> Build Summary:
--> Building image done
image: registry.fly.io/snac2:deployment-01JZFDBPH580MA9314YVCZ7X00
image size: 6.6 MB
Watch your deployment at https://fly.io/apps/snac2/monitoring
-------
Updating existing machines in 'snac2' with rolling strategy
-------
✔ Cleared lease for 4d8961d1c53e18
-------
...
数据备份 #
作为超轻量级应用,snacs在设计上没有使用数据库比如SQLite,而是直接通过文件来存储数据,同时大量使用了硬链接方式。相应的,备份也是将所有文件打包作为简单可行。
服务器端 #
# ssh 登录实例
% fly ssh console
Connecting to fdaa:1:f1c:a7b:480:88f1:5f6c:2... complete
# 备份 /data 目录
4d8961d1c53e18:/# tar -czf backup.tar.gz -h /data
tar: removing leading '/' from member names
电脑端 #
# 创建ssh agent
% fly ssh issue --agent
? Select Organization: yee (personal)
Populated agent with cert:
[email protected] AAAAIHNzaC1lZDI1NTE5LWNlcnQtdjAxQG9wZW5zc2guY29tAAAAIHmI4bJr+ON93i/UaJB8utqT6sLKGo5GG2JKm0NiCUT7AAAAIJCHnirHqq16oNWokpR1E2
...
# 将本机10222端口映射到服务端的22 ssh端口,启动通道
% fly proxy 10022:22
Proxying local port 10022 to remote [snac2.internal]:22
另外一个terminal下执行
% scp -P 10022 root@localhost:/backup.tar.gz /Users/yee/Downloads/snac2_backup.tar.gz
backup.tar.gz
将文件传输到本机存档。